Inspiration
I decided it would be great to have coasters at the
new apartment. My friend and I are
planning to have a lot of guests over throughout the year for dinner parties
and movie nights, so why not have coasters! I turned 21 in May, and I’ve always
had the feeling coasters were very mature. Throughout college, I’ve never once thought about having
these, and I’m starting to think that it’s about to have a couple. I started searching for tile ideas, and
one that caught my eye were painted tiles.
The next question: What is the design on the tile?
I started seeing these outward patterns.
I loved how they focused your attention to the middle and then as looked
out the pattern grew. I wanted to
give that effect to the coaster in a simplified manner. I decided to go with the chevron
pattern. It’s not too busy and it
definitely catches the eye. It was
a perfect combination.
Materials
Home Depot
4.25” x 4.25” tile
Heavy Duty Felt Pads (4 for each coaster)
AC Moore
Thin Masking Tape
Paint Brush
1. Taping The Tile
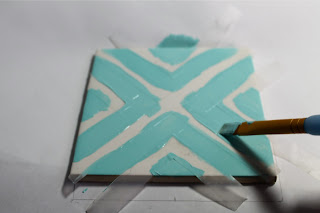
To create the outward Chevron pattern, you have to
begin by marking an X in the middle of the tile. Once you have centered the X.
Tape Triangle on each 4 sides.
Please make sure that the triangles are centered with the X. It keeps the design precise.
2. Choose your color
Once you have chosen your color, paint the tile. I
recommend painting 2-3 layers of paint to enhance the color. Let the paint dry for about 5 minutes
and then peel off the tape. Let the paint dry again for another 5 min. After you are certain that the tile is
dry, paint the tile with High Gloss Finish. The finish will seal the tile and make it suitable for use.
3. Felt Pads
Stick on 4 felt pads on the bottom of each
coaster. This will help you not
damage your furniture.
Alternative: You can glue squares of felt on the
bottom of tiles as well.
The Results
 |
| Just need to make a couple more and we are ready for the housewarming party! |


No comments:
Post a Comment